How to add Checkout Options in Kajabi
Do you want to give your customers a choice to choose between different payment options or give them an upsell option? Then, this code can help you make this happen.
Here is a quick example on how it looks:

When the customer choose an option, they are redirected to a new offer in Kajabi. Which means you need to create one offer in Kajabi for each offer you want in the list.
Here is step by step what you need to do:
1. Checkout Settings
Go to Checkout Settings in Kajabi, and paste this code in the "Header Tracking Code" section:
<style> .edpay-option { padding: 10px 10px; margin-top: 5px; } .edpay-option-image {
width: 25px; float: left; margin-right: 9px; } .edpay-option-active { font-weight: bold; border-radius: 4px; }</style>
And paste this code in the "Footer Tracking Code" section:
<script> // Checkout options $(document).ready(function (){ var options = $('.edpay-options').html(); $('.panel-heading').append(options); $('.edpay-option').each(function() { $(this).find('a').css('color', $('body').css('color')); if($(this).find('.edpay-option-link').attr('href').indexOf(window.CLIENT_INFO.offer_token) >= 0){ $(this).addClass('edpay-option-active'); $(this).find('.edpay-option-image').attr('src', 'https://app.edpay.co/image/checked_option.png'); $(this).css('background-color', $('body').css('background-color')); } else { $(this).find('.edpay-option-image').attr('src', 'https://app.edpay.co/image/unchecked_option.png'); } }); });</script>
2. Add the Checkout Options to Checkout Description
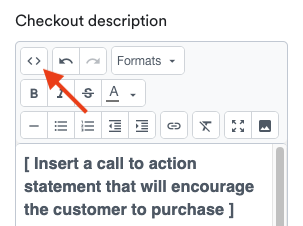
Go to "Edit Checkout" - "Page Content" - "Checkout Description" and paste the below code into the "Source code" (the < > icon), here:

<div class="edpay-options" style="display: none;"> <div class="row" style="margin-top: 25px;"> <div class="col-md-9 col-xs-9"><strong> Choose course </strong></div> <div class="col-md-3 col-xs-3"><strong> Price </strong></div> </div>
<!-- Option 1 starts here --> <div class="edpay-option"> <div class="row"> <div class="col-md-9 col-xs-9"> <a class="edpay-option-link" href="https://www.example.com/offers/123abc"> <img class="edpay-option-image" src=""/> Essential </a> </div> <div class="col-md-3 col-xs-3"> €49 </div> </div> </div> <!-- Option 1 ends here -->
<!-- Option 2 starts here --> <div class="edpay-option"> <div class="row"> <div class="col-md-9 col-xs-9"> <a class="edpay-option-link" href="https://www.example.com/offers/abc123"> <img class="edpay-option-image" src=""/> Pro </a> </div> <div class="col-md-3 col-xs-3"> €79 </div> </div> </div> <!-- Option 2 ends here -->
<!-- To create more options just copy one of the options above and paste it below this line --> </div>
If you want to add more options, just copy one of the options above and paste them in below the "Option 2 ends here" comment in the code.

You should only change the text marked in red:
- Options title
- Price title
- Offer links (something like this: "https://www.edpay.co/offers/abc123123" or just "/offers/abc123123")
- Offer name
- Offer price
The code will automatically make the correct option "checked", so you only need to create one code for all the offers you want the options to appear on. If you want the checked option to be on top, you need to rearrange the options for each checkout page.
NB: This checkout hack is based on Jodee Peevor's post in the official Kajabi Facebook group: https://www.facebook.com/groups/newkajabi/posts/4289351877754154. We just made it a little better and simpler to use 😊

